How Long Does a Kitchen Remodel Take? Realistic Timeline
Published on Jun 14, 2026
How Long Does a Kitchen Remodel Take? A Real-World Timeline You Can Actually Plan Around
A kitchen remodel rarely takes “6 weeks.” That’s the line people repeat—right up until cabinets arrive late, the countertop template gets pushed, or an inspection lands three days later than promised.
The real question isn’t just how long construction takes. It’s how long you’ll live in renovation limbo—and what you can do to keep the schedule from sliding.
From experience, the homeowners who feel most in control aren’t the ones with the biggest budgets. They’re the ones who understand the sequence and the bottlenecks before anyone swings a hammer.
Here’s what you’ll learn:
- Typical timeline ranges by scope (not wishful thinking)
- Phase-by-phase schedule with dependencies
- Most common delay traps—plus how to avoid them
- Sample timelines to sanity-check contractor estimates
Typical Kitchen Remodel Timeline (Quick Answer + Ranges)
Before getting into details, know the difference: project duration vs how long your kitchen is unusable. Mixing these up is where expectations go sideways.
Realistic starting points:
- Cosmetic refresh: ~1–3 weeks
- Pull-and-replace (same layout): ~6–10 weeks
- Full gut remodel (new layout, new rough-ins): ~10–16+ weeks
- Structural changes or additions: ~4–8+ months
Actionable takeaway: If you need the kitchen back by a specific date (holiday, new baby), plan backward and add a buffer of 2–4 weeks for the unexpected.
Quick rule of thumb: Moving plumbing, moving walls, or changing electrical layouts? You’re no longer in “simple timeline” territory.
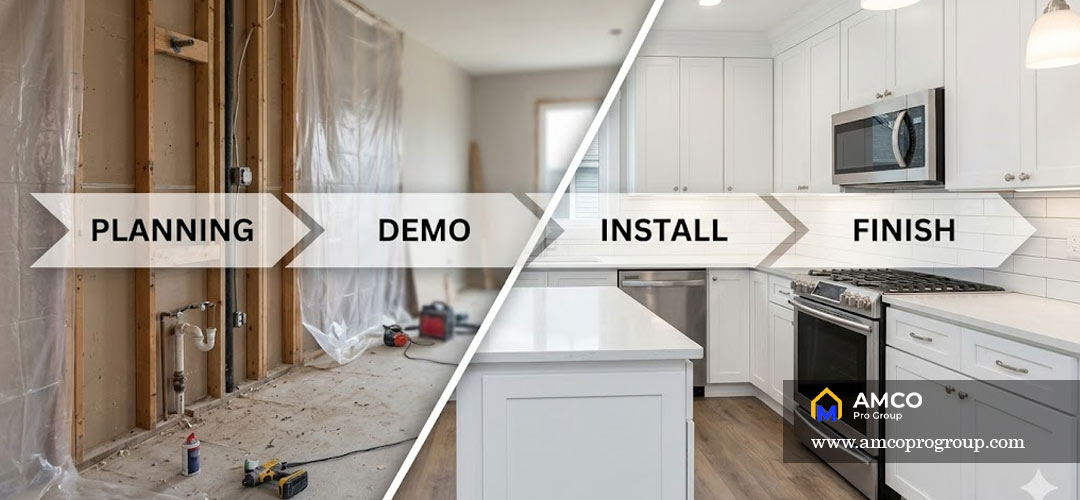
What “Remodel Time” Actually Includes (Design + Ordering + Construction)
A common mistake: starting the calendar on demo day. A realistic timeline includes:
- Planning & Design – Layout, measurements, selections
- Ordering Lead Times – Cabinets, appliances, tile
- Construction – Demo through final finishes
- Final Stages – Inspections, adjustments, punch list
Always ask your builder for two timelines: pre-construction (design + order) and on-site construction (demo → completion).
READ MORE : How to Design a Modern Home on a Budget
Timeline by Project Type (No Wishful Thinking)
1) Cosmetic Refresh – 1–3 weeks
Paint, light fixture swaps, new hardware/faucet, maybe a backsplash.
- Slowdowns: Specialty tile lead times, contractors squeezing in small jobs.
- Keep it moving: Order materials before booking labor.
2) Pull-and-Replace (same footprint) – 6–10 weeks
New cabinets, countertops, appliances—same layout.
- Where time goes: Cabinet lead times + delivery accuracy, countertop process (template → fabricate → install).
- Avoid drift: Don’t demo until cabinets are confirmed (not just “ordered”). Choose appliances early.
3) Full Gut Remodel – 10–16+ weeks
Walls opened, electrical and plumbing re-routed, new flooring.
- Why longer: Rough-ins require inspections. Layout changes create dependencies. Hidden conditions appear.
- Planning rule: Build in a 2–4 week schedule buffer and 10–15% contingency budget.
4) Structural / Expansion – 4–8+ months
Removing load-bearing walls, adding square footage, complex permitting.
- Dominant factors: Engineering, permit review cycles, specialty labor availability, HOA approvals.
- Stay in control: Ask for a milestone plan (permit approval, framing, rough-in, drywall).
Step-by-Step Phases (From Planning to Punch List)
A kitchen remodel is a chain of dependencies. One slip delays everything.
Planning & Design – 2–6+ weeks
Measurements, final layout, budget alignment.
- Why it matters: Changes later create change order delays.
- Do this: Lock your layout before ordering cabinets or appliances.
Selecting Materials + Ordering Lead Times – 2–10+ weeks
This is where timelines quietly die.
- Long-lead items: Cabinets (stock vs semi-custom vs custom), appliances, countertop stone, specialty tile.
- Reduce risk: Choose predictable lead times. Order early. Confirm delivery dates in writing.
Construction Sequence – 4–12+ weeks
- Site protection + demo – Dust barriers, floor protection, tear-out.
- MEP rough-in – Electrical, plumbing, HVAC (depends on layout + appliance specs).
- Drywall + prime/paint – After rough-ins and any required inspections.
- Flooring – Sequence depends on cabinet plan.
- Cabinet installation – Requires floors and walls ready.
- Countertop template → fabrication → install – Can’t happen until cabinets are level.
- Backsplash + finish carpentry
- Appliance install + trim-out
Why the sequence matters: Countertops can’t be templated until cabinets are installed. Appliances need exact rough-in placement. Ask your contractor to explain the dependency chain.
Final Inspections + Punch List – 3 days to 2+ weeks
The last 10% that takes 30% of your patience.
- Includes: Final inspections (if permitted), adjustments, touch-up paint, documented punch list.
- Keep it moving: Do a pre-walkthrough yourself. Don’t release final payment until punch list items are completed.
The 4 Biggest Delay Traps (And How to Prevent Them)
1. Permits & Inspections
- Why it delays: Review times vary, inspector availability is limited, failed inspections trigger rework.
- Prevent it: Confirm early if permits are needed. Ask what inspections are expected and who schedules them.
2. Material Lead Times & Backorders
- Why it delays: Cabinets arrive late or damaged, appliances backordered, countertop slabs unavailable.
- Prevent it: Confirm lead times before demo. Have backup alternatives approved.
3. Scope Creep & Change Orders
- Examples: “Move the sink 6 inches” (plumbing + cabinet mods). “Add under-cabinet lighting” (electrical + drywall).
- Control it: Document every change order with cost + time impact. Keep a “parking lot” list for later upgrades.
4. Hidden Conditions
- Examples: Rot under the sink, outdated wiring, uneven subfloors.
- Plan for it: Add schedule buffer and contingency budget. Hidden conditions aren’t an “if” on older homes—they’re a “when.”
How to Speed Up Your Remodel (Without Cutting Corners)
Speed is won before demo starts.
Decisions to lock early:
- Cabinet layout and finish
- Appliance package (with spec sheets)
- Sink/faucet and lighting plan
- Countertop material and tile selection
Simple rule: If it needs to be inside a wall, decide it before demo.
Strategies that reduce downtime:
- Stock cabinets vs custom (shorter lead times)
- Pre-order appliances so rough-ins aren’t guessing
- Choose readily available tile and fixtures
GC vs DIY vs managing subs yourself:
- General contractor: Typically faster due to scheduling control.
- DIY: Slower unless you have time, skill, and consistent availability.
- You managing subs: Coordination handoffs often add days.
Temporary kitchen setup to stay functional:
- Microwave, toaster oven, or induction burner
- Mini fridge (or dedicated shelf in another fridge)
- Dish bin + drying rack
- Coffee station (non-negotiable)
Ask your contractor: “When will the sink be offline?” and “When will appliances be disconnected?” Those dates matter more than final completion.
Sample Timelines + Planning Checklist
Sample 6–8 week (same layout, materials ready):
- Week 1: Demo + minor rough-ins
- Week 2-3: Drywall, paint, flooring
- Week 4: Cabinet installation
- Week 5: Countertop template → fabrication
- Week 6-7: Counter install, backsplash, appliances
- Week 8: Punch list + touchups
Sample 10–14 week (layout change, full gut):
- Weeks 1-2: Demo + framing changes
- Weeks 3-4: MEP rough-ins + inspections
- Weeks 5-6: Drywall + prime/paint
- Weeks 7-8: Flooring + cabinets
- Weeks 9-10: Countertop process
- Weeks 11-12: Backsplash, trim, appliance install
- Weeks 13-14: Inspections + punch list + buffer
Pre-construction checklist (do not demo until these are done):
- Final layout and cabinet design approved
- Appliance specs confirmed and shared with trades
- Cabinets ordered (delivery date confirmed)
- Countertop material selected (fabricator scheduled)
- Lighting plan finalized
- Permits submitted/approved (if required)
- Dust control plan and temporary kitchen setup ready
Questions to ask your contractor to spot a realistic schedule:
- What are the long-lead items, and when are they being ordered?
- When will cabinets arrive? What if they’re damaged?
- What inspections are required, and who schedules them?
- How many other projects are you running simultaneously?
- What’s the process for change orders—cost and time?
- When exactly will the kitchen be unusable (sink, stove, power)?
A good schedule includes buffers and milestones. A bad schedule is just a finish date.
Next Step for Your Kitchen
To get a realistic timeline for your home, define three things: scope, material lead times, and permit/inspection needs. When you’re ready, consult with a contractor who can give you a timeline based on your layout, your selections, and your local permitting reality—not a wish.